Extending the BizTalk ESB Toolkit - Orchestration
Recently, I have been doing some work with the ESB Toolkit. I needed
to use an orchestration as an itinerary service, and while there is some
documentation on how to build an orchestration that can be used as an
itinerary service, there is nothing in the documentation that shows how
to get your custom orchestration to show up in the itinerary designer.
After spending some time pulling my hair out trying to get this to work,
I managed to stumble upon this blog post and this video that
outline the steps necessary to make a custom orchestration available in
the itinerary designer.
Without further ado, here is what it takes to create a custom
orchestration for use with the ESB Toolkit.
Create your Itinerary Service Orchestration
Add the following references to your orchestration project:
- Microsoft.Practices.ESB.Itinerary
- Microsoft.Practices.ESB.Itinerary.Schemas
- Microsoft.Practices.ESB.ExceptionHandling
- Microsoft.Practices.ESB.ExceptionHandling.Schemas.Faults
Add a logical direct-bound receive port and a receive shape with the
“Activate” property set to true to your orchestration.
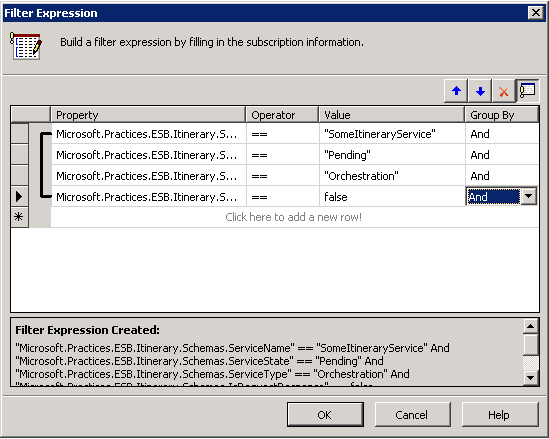
Set the receive shape filter expression to subscribe to the
itinerary context properties:
Create orchestration variables of type
Microsoft.Practices.ESB.Itinerary.IItinerary and
Microsoft.Practices.ESB.Itinerary.IItineraryStep. Use an expression
shape to get the current itinerary.
1 | itineraryWrapper = new Microsoft.Practices.ESB.Itinerary.SerializableItineraryWrapper(); |
- Add your custom logic to the orchestration.
- Advance the itinerary to the next step and attach it to the outbound
message.
1 | msgOutbound(*) = msgInbound(*); |
- Send the outbound message to the message box using a direct-bound
send port.
Add your Orchestration to the Itinerary Designer
Open the Esb.config file in the ESB Toolkit installation directory
and add a new itineraryService element with the following
attributes:- id: A GUID to identify the new service minus the curly braces.
- name: The assigned name for your orchestration. This will be the
name that shows up in Visual Studio and it used by the filter
expression. - type: The fully qualified type name of the orchestration.
- scope: Since this is an orchestration it should be set to
Orchestration. - state: None
Example:
1 | <itineraryservice id=”0f8fad5b-d9cb-469f-a165-70867728950e” |