Configuring BizTalk 2006 R2 for AS2: Part 3 Configuring IIS to Receive Transactions
Now that we have our certificates installed, it is time to start
configuring BizTalk for AS2 communication. AS2 communicates via
HTTP, so the
first thing we need to is to create a website in
IIS to use as an
endpoint for receiving AS2 messages. Please note that these instructions
are for IIS6, which ships with Windows Server 2003. They may or may not
work on other versions of IIS/Windows.
First thing, open up the IIS administration console and create a new
website. Give it a meaningful name, like say “AS2”, and assign an IP
address and port number. There is nothing in the AS2 standard that
specifies what port the service should run on, but typically a high port
like 4080 or 5080 is used. This may also be dictated by your trading
partner’s requirements.
Next you will need to point to the site’s home directory. This will be
the HttpReceive directory under the BizTalk installation directory. This
is usually C:\Program Files\Microsoft BizTalk Server 2006\HttpReceive
but it may be different depending on how BizTalk was installed. Finally,
ensure that the site has both Read permissions and Scripts and
Executables permissions set. BizTalk communicates with IIS using an
ISAPI component which requires the additional permissions to run.
Next we need to create a new AppPool using an identity that has local
administrator permissions on the BizTalk server. I do not know if
administrator rights are truly necessary, but that is what the
Microsoft documentation recommends and I have not had the time to
experiment with it to find out. Configure the website to use this new
AppPool and restart IIS to ensure that the new settings take effect.
At this point it would a good idea to see if the BTSHttpReceive ISAPI
component has been registered with IIS. (If you installed the BizTalk
Human Workflow components that the ISAPI filter has already been
registered for you) Check the Web Services Extensions section in the IIS
administration console, and if the BizTalk ISAPI component has not been
registered go ahead and add it now.
With the website endpoint in place, we can now configure a receive port
and location inside of BizTalk. Open up the BizTalk administration
console, navigate to the application you want to add the AS2 port to,
and create a new request-response port. Add a new receive location to
the port, setting the type to HTTP as displayed in the image below.

The receive and send pipeline settings will be dependent on how you have
organized your EDI application. The settings in the image happen to be
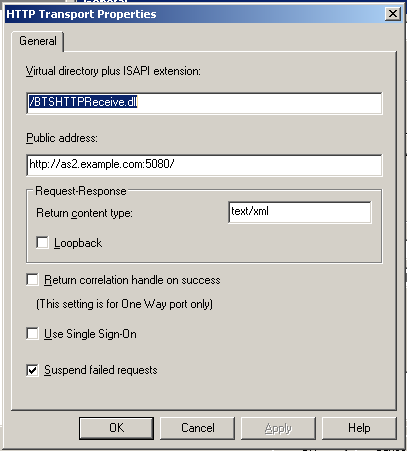
the ones that I use in one of my setups. Click on the Configure button
for the HTTP adapter, and set the the virtual directory field to contain
the path to the BTSHTTPReceive.dll file in the HttpReceive directory.
You may also want to set the public address to the
URI that points to
the AS2 endpoint. You will also want to remove the check from the
“Return correlation handle” box, and check the “Suspend failed requests”
box. The latter is important otherwise BizTalk will not record an error
if there is a problem with a received message.

With that, we have successfully configured an AS2 receive location. Next
time we will configure an AS2 send port and a BizTalk party for AS2
communication.